

Red Velvet Brownies: The Perfect Cake-Cheesecake Combo
Meta Description: Discover the delicious world of Red Velvet Brownies, a perfect blend of cake and cheesecake for your dessert adventures!
Introduction to Red Velvet Brownies
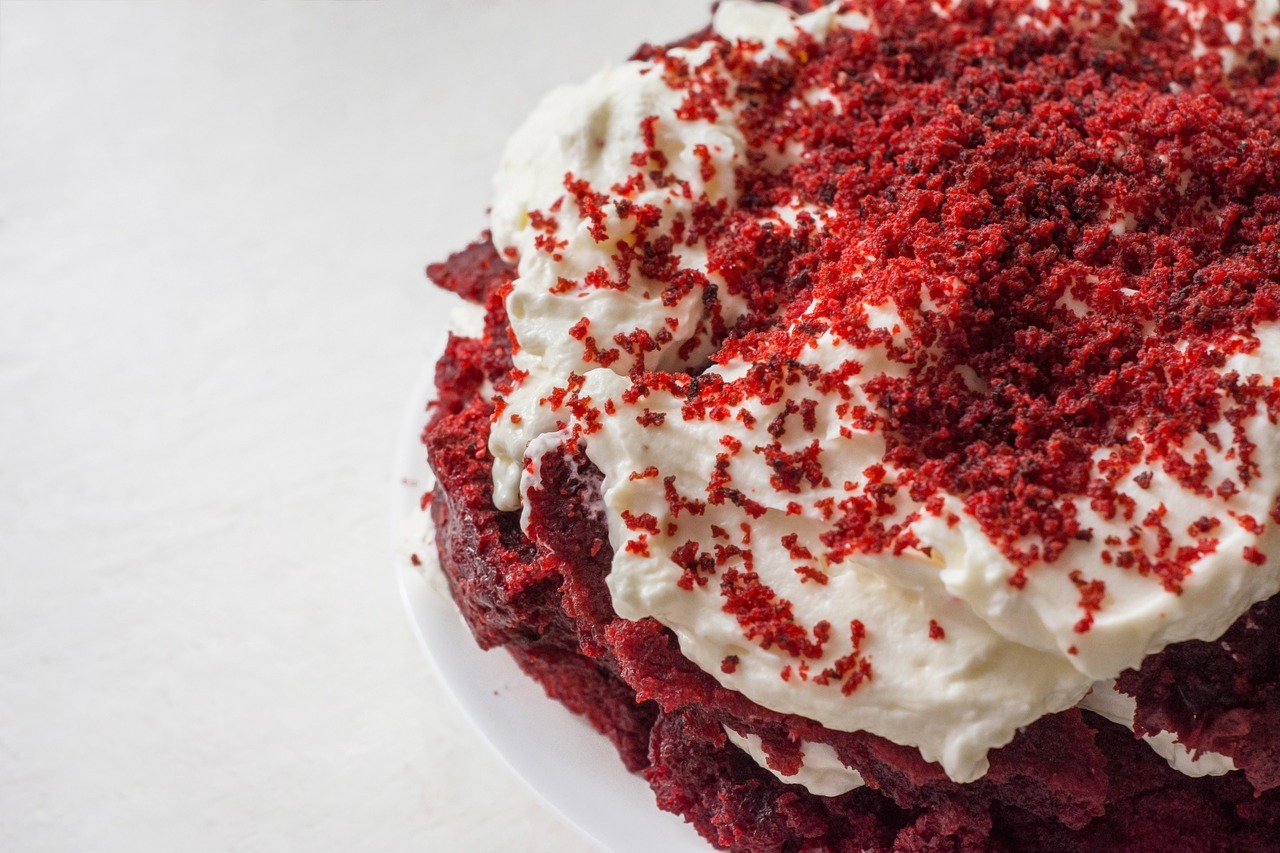
When it comes to dessert innovation, few creations capture the imagination quite like red velvet brownies. These decadent treats represent the perfect marriage between the beloved red velvet cake tradition and the rich, fudgy texture of classic brownies. What makes these brownies truly special is their incorporation of a luxurious cream cheese swirl that rivals even the most sophisticated godiva chocolate cheesecake recipe.
Red velvet brownies have emerged as a standout dessert that satisfies multiple cravings simultaneously. The vibrant crimson color immediately catches the eye, while the complex flavor profile delivers on every promise. Unlike traditional brownies that rely solely on chocolate for their appeal, these beauties incorporate the subtle cocoa notes characteristic of red velvet, balanced with tangy cream cheese that creates a cheesecake-like experience within each bite.
The genius of this dessert lies in its ability to combine textures and flavors that complement each other perfectly. The dense, moist brownie base provides substance and richness, while the cream cheese swirl adds brightness and tang that cuts through the sweetness. This combination creates a dessert experience that’s both familiar and exciting, offering the comfort of traditional flavors with an innovative twist that keeps people coming back for more.
For home bakers seeking to elevate their dessert game, red velvet brownies offer the perfect opportunity to showcase advanced baking techniques while creating something truly memorable. Whether you’re hosting a dinner party, contributing to a bake sale, or simply treating your family to something special, these brownies deliver restaurant-quality results that rival any chocolate godiva cheesecake recipe you might find at upscale establishments.
Why Red Velvet Brownies Are a Must-Try Dessert
The History of Red Velvet Cake
The fascinating history of red velvet cake traces back to the Victorian era, where “velvet” cakes were prized for their exceptionally fine crumb and luxurious texture. The distinctive red color originally came from a natural chemical reaction between acidic ingredients like buttermilk and vinegar with the anthocyanins in cocoa powder, creating a subtle reddish hue that distinguished these cakes from their purely chocolate counterparts.
During the Great Depression, resourceful bakers began emphasizing the red color as a marketing strategy, with some bakeries even adding beetroot juice to enhance the visual appeal. The Adams Extract Company played a pivotal role in popularizing red velvet cake by distributing recipe cards alongside their red food coloring, effectively spreading this Southern delicacy across the nation.
The cake gained legendary status when it became the signature dessert at New York’s Waldorf-Astoria Hotel in the 1950s. Stories tell of guests being so enchanted by the mysterious red cake that they would request the recipe, only to be charged an exorbitant fee for the “secret.” This exclusivity only added to its allure, cementing red velvet’s reputation as a premium dessert.
Modern red velvet cake has evolved to incorporate more pronounced chocolate flavors while maintaining its characteristic tangy cream cheese frosting. The cake’s popularity has inspired countless variations, from cupcakes to cookies, and now these innovative brownies that capture all the beloved elements in a new format. Understanding this rich history helps bakers appreciate why red velvet continues to captivate dessert enthusiasts, making it an ideal foundation for creative interpretations like our brownie adaptation.
Combining Cake and Cheesecake: A Match Made in Heaven
The concept of combining cake and cheesecake elements isn’t entirely new, but the execution in red velvet brownies represents a masterclass in dessert engineering. Traditional cheesecake brings richness, tanginess, and a creamy texture that perfectly complements the denser, more substantial nature of brownie batter. This combination creates what many consider superior to even the most elaborate recipe for godiva chocolate cheesecake.
The science behind this successful pairing lies in the contrast of pH levels and fat content. Red velvet batter, with its slightly acidic profile from buttermilk and vinegar, creates a tender crumb that doesn’t compete with the cream cheese component. Instead, these elements work synergistically, with the acidity brightening the overall flavor profile while the cream cheese adds richness and moisture that prevents the brownies from becoming overly dense.
Texture contrast plays an equally important role in this dessert’s success. The brownie base provides a satisfying chew and substantial mouthfeel, while the cream cheese swirl offers smooth, creamy pockets that melt on the tongue. This textural interplay keeps each bite interesting and prevents palate fatigue that can occur with overly uniform desserts.
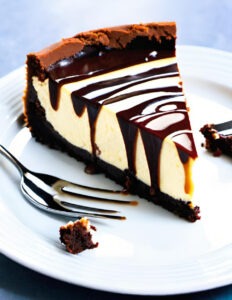
The visual appeal cannot be understated either. The marbled effect created by swirling cream cheese through red velvet batter produces an Instagram-worthy appearance that rivals professional bakery presentations. This aesthetic appeal, combined with the complex flavor profile, makes these brownies suitable for both casual family gatherings and elegant dinner parties. The end result is a dessert that captures the essence of both red velvet cake and New York-style cheesecake in a format that’s easier to serve and more portable than either traditional dessert alone.
Ingredients for Perfect Red Velvet Brownies
Common Ingredients and Their Roles
The foundation of exceptional red velvet brownies begins with understanding how each ingredient contributes to the final product. All-purpose flour provides structure and helps create the characteristic brownie texture, while cocoa powder delivers the subtle chocolate notes that distinguish red velvet from purely vanilla-based cakes. The cocoa should be unsweetened and high-quality to avoid overwhelming the delicate flavor balance.
Butter serves multiple purposes, contributing to both flavor and texture while helping to create the tender crumb that makes these brownies so appealing. Room temperature butter incorporates more easily and creates better emulsification with the other ingredients. Granulated sugar not only sweetens but also contributes to the brownie’s structure and helps achieve the slightly crispy top that contrasts beautifully with the tender interior.
Eggs act as both binder and leavening agent, while also contributing richness and helping to create the fudgy texture that defines great brownies. The cream cheese component requires full-fat cream cheese for optimal flavor and texture, along with additional sugar and egg to create the cheesecake-like swirl that makes these brownies special.
Red food coloring is essential for achieving the signature appearance, while buttermilk and white vinegar provide the acidity that creates red velvet’s characteristic tang and helps tenderize the gluten structure. Vanilla extract enhances all the other flavors without competing, creating a more complex and satisfying overall taste experience.
Optional Add-Ins and Variations
Creative bakers can elevate their red velvet brownies with thoughtful additions that complement rather than compete with the core flavors. White chocolate chips provide sweet pockets that echo the cream cheese element while adding textural interest. These chips should be folded in gently to avoid overmixing the batter.
Chopped pecans or walnuts introduce a satisfying crunch and nutty flavor that pairs beautifully with both red velvet and cream cheese components. Toast the nuts lightly before adding to enhance their flavor and ensure they maintain their texture during baking. For those seeking a more decadent experience, mini chocolate chips can add extra richness without overwhelming the delicate red velvet flavor.
Some bakers enjoy incorporating a hint of espresso powder to deepen the chocolate notes and add complexity, similar to techniques used in sophisticated chocolate godiva cheesecake factory recipe variations. This addition should be used sparingly, as the goal is enhancement rather than transformation.
For special occasions, consider adding a layer of cream cheese frosting on top after baking and cooling, creating a dessert that truly bridges the gap between brownies and cheesecake. Lemon zest in the cream cheese swirl can brighten the overall flavor profile, while a touch of almond extract can add sophistication that rivals professional bakery creations.
Step-by-Step Instructions for Making Red Velvet Brownies
Preparing the Red Velvet Batter
Begin by preheating your oven to 350°F and preparing an 8×8 inch baking pan with parchment paper, leaving overhang for easy removal. This preparation step is crucial for achieving professional results and ensuring your brownies don’t stick to the pan.
In a medium bowl, whisk together flour, cocoa powder, and salt, ensuring no lumps remain. This dry ingredient mixture should be set aside while you prepare the wet ingredients. In a large mixing bowl, cream together softened butter and granulated sugar until light and fluffy, approximately 3-4 minutes with an electric mixer. This creaming process incorporates air and creates the foundation for the brownie’s texture.
Add eggs one at a time, beating well after each addition to ensure proper emulsification. The mixture should be smooth and well-combined before proceeding. In a small bowl, whisk together buttermilk, red food coloring, vanilla extract, and white vinegar. The vinegar will react slightly with the buttermilk, which is expected and contributes to the characteristic red velvet flavor profile.
Alternate adding the dry ingredients and the buttermilk mixture to the creamed butter mixture, beginning and ending with the dry ingredients. Mix just until combined after each addition, as overmixing can result in tough brownies. The finished batter should be smooth, vibrant red, and have a consistency similar to thick cake batter. Pour this mixture into your prepared pan, spreading evenly with an offset spatula to ensure uniform baking.
Creating the Cream Cheese Swirl
The cream cheese component requires careful attention to achieve the perfect texture and flavor that rivals any cheesecake factory godiva chocolate cheesecake recipe. Begin with cream cheese that has been brought to room temperature, as cold cream cheese will create lumps and won’t incorporate smoothly into the brownie batter.
In a medium bowl, beat the softened cream cheese with an electric mixer until completely smooth and free of lumps. This process typically takes 2-3 minutes and is crucial for achieving the silky texture that makes the swirl so appealing. Gradually add granulated sugar, beating until the mixture is light and fluffy. The sugar should be completely incorporated with no grittiness remaining.
Add the egg and vanilla extract, beating just until combined. Overbeating at this stage can incorporate too much air, which may cause the cream cheese layer to puff and crack during baking. The finished cream cheese mixture should be smooth, creamy, and easily spreadable.
Drop spoonfuls of the cream cheese mixture over the red velvet batter in the prepared pan, distributing it as evenly as possible. Using a knife or skewer, create swirl patterns by gently drawing through both mixtures, being careful not to overmix. The goal is to create beautiful marbled patterns while maintaining distinct layers of each component. The swirling technique should be gentle and purposeful, creating visual interest without completely combining the two mixtures.
Serving Suggestions and Pairings
Accompaniments and Beverages
Red velvet brownies offer versatility in serving options that can transform them from casual treats to elegant dessert course offerings. For casual serving, these brownies are perfect on their own, cut into generous squares and served at room temperature when their flavors are most pronounced and the texture is at its optimal point.
For more formal presentations, consider serving slightly warmed brownies with a scoop of vanilla bean ice cream or cream cheese ice cream to echo the flavors within the brownie itself. The temperature contrast and additional creaminess elevate the dessert experience significantly. A drizzle of chocolate sauce or berry coulis can add color and complementary flavors without overwhelming the delicate red velvet taste.
Coffee pairings work exceptionally well with these brownies, as the slight bitterness balances the sweetness while the warmth enhances the chocolate notes. Cold brew coffee, cappuccino, or even a sophisticated espresso-based drink can create a café-worthy dessert experience. For non-coffee drinkers, black tea, particularly Earl Grey or English Breakfast, provides similar flavor balance.
Milk remains a classic pairing that appeals to all ages, while dessert wines like port or a sweet Riesling can create an elegant finish to dinner parties. The key is choosing beverages that complement rather than compete with the complex flavor profile of the brownies themselves.
Presentation Ideas for Special Occasions
Transform your red velvet brownies into showstopping desserts worthy of special celebrations with thoughtful presentation techniques. For birthdays or anniversaries, cut brownies into heart shapes using cookie cutters, then dust with powdered sugar for an elegant finish that rivals professional bakery presentations.
Layer cut brownies with fresh whipped cream and berries in clear glasses to create individual trifle-style desserts that showcase the beautiful red color while adding fresh flavors and appealing visual height. This presentation technique works particularly well for dinner parties where individual servings are preferred.
For holiday gatherings, arrange brownies on tiered serving stands interspersed with seasonal decorations. During winter holidays, a light dusting of powdered sugar creates a snow-like effect, while spring celebrations can feature fresh flower garnishes that complement the red color beautifully.
Consider creating a dessert bar featuring your red velvet brownies alongside complementary treats, allowing guests to customize their dessert experience. Provide small bowls of chopped nuts, chocolate chips, berries, and whipped cream so guests can create their own perfect combination.
Tips for Perfecting Your Brownies
Achieving bakery-quality red velvet brownies requires attention to several key technical details that can make the difference between good and exceptional results. Temperature control throughout the process is crucial, starting with ensuring all ingredients are at proper room temperature before beginning. Cold ingredients don’t emulsify properly and can result in a dense, uneven texture that lacks the lightness that makes these brownies special.
Measuring ingredients accurately is particularly important in brownie recipes, where the balance between wet and dry ingredients determines the final texture. Use a kitchen scale when possible for the most consistent results, especially for flour and cocoa powder, which can vary significantly in volume depending on how they’re packed.
Don’t overbake your brownies, as they continue cooking from residual heat even after removal from the oven. Look for the point where the center is just set but still slightly soft, and the edges are beginning to pull away from the pan. A toothpick inserted in the center should come out with just a few moist crumbs clinging to it.
Allow proper cooling time before cutting, as warm brownies will fall apart and won’t achieve the clean cuts that make for attractive presentation. Room temperature brownies cut cleanly and maintain their shape, while warm brownies tend to crumble and lose their visual appeal.
Store finished brownies in an airtight container at room temperature for up to a week, or freeze for longer storage. The cream cheese component means these brownies maintain moisture better than traditional chocolate brownies, making them ideal for advance preparation for special events.
Conclusion: Your Next Dessert Adventure
Red velvet brownies represent the perfect evolution of classic dessert traditions, combining the beloved characteristics of red velvet cake with the satisfying richness of brownies and the elegant sophistication of cheesecake elements. This innovative dessert offers home bakers the opportunity to create something truly special that rivals even the most elaborate godiva chocolate cheesecake factory recipe in both flavor complexity and visual appeal.
The versatility of these brownies makes them suitable for any occasion, from casual family treats to elegant dinner party finales. Their make-ahead friendly nature and excellent keeping qualities make them practical choices for busy hosts who want to serve impressive desserts without last-minute stress. The combination of familiar flavors presented in an innovative format ensures broad appeal while still offering the excitement of something new and special.
The techniques involved in creating perfect red velvet brownies also serve as excellent learning opportunities for developing baking skills. From proper creaming techniques to achieving the perfect cream cheese swirl, each step builds competence and confidence that transfers to other baking projects. The visual feedback provided by the distinctive red color and marbled pattern makes it easy to assess technique and make improvements with each batch.
As you embark on your red velvet brownie adventure, remember that the best results come from using quality ingredients, following techniques carefully, and allowing yourself to enjoy the creative process. These brownies offer the perfect canvas for experimentation with flavors and presentations while maintaining a foundation that’s virtually guaranteed to impress. Whether you’re seeking to master a new signature dessert or simply want to treat yourself and others to something extraordinary, red velvet brownies deliver an experience that satisfies on every level.
Related posts:
 Delicious Luscious Lemon Raspberry Swirl Cheesecake Cups
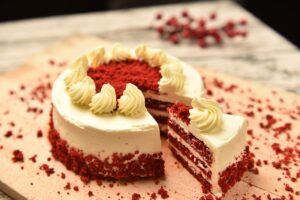 How To Make Red Velvet Brownies: A Decadent Dessert That Anyone Can Master
 Decadent Chocolate Cherry Upside Down Cake: A Perfect Blend Of Rich And Fruity Flavors
 Brownie Cheesecake Recipe: The Ultimate Indulgent Dessert You Need To Try
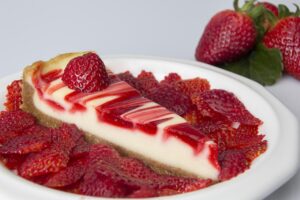 Strawberry Swirl Cheesecake: A Delectable Classic With A Fresh Twist