


Discovering the Soul of Japan’s Most Beloved Comfort Food
There’s something almost magical about the first crunch of perfectly executed katsu—that moment when your teeth break through layers of golden, crispy armor to reach the succulent meat hiding beneath. This isn’t just fried food; it’s culinary architecture where every layer serves a purpose, every texture tells a story, and every bite delivers pure satisfaction.
Japanese katsu represents more than a cooking technique—it’s a testament to the Japanese philosophy of pursuing perfection through simplicity. What appears to be merely breaded and fried protein is actually a carefully orchestrated symphony of temperatures, textures, and timing that transforms humble ingredients into something transcendent.
Today, we’ll demystify this beloved dish and show you how to achieve restaurant-caliber results using nothing more than your home kitchen and a commitment to understanding the fundamentals that make katsu extraordinary.
Building Your Katsu Foundation: Ingredients That Matter
The Star of the Show – Your Protein
- 4 pieces boneless pork loin or chicken breast (each weighing 6 ounces)
- 1 cup plain flour (substitute with rice flour for those avoiding gluten)
- 2 large eggs, beaten until smooth
- 2 cups authentic Japanese panko crumbs (this isn’t negotiable for true katsu)
- 1 teaspoon kosher salt
- ½ teaspoon coarsely ground black pepper
- ½ teaspoon garlic powder
- Neutral cooking oil for deep frying (about 2 cups total)
Creating the Perfect Katsu Sauce
- ½ cup tomato ketchup (surprisingly essential)
- 3 tablespoons quality Worcestershire sauce (depth incarnate)
- 2 tablespoons rich soy sauce (or tamari for gluten-sensitive diners)
- 1 tablespoon authentic mirin (Japanese cooking wine)
- 1 tablespoon packed brown sugar (complexity builder)
- 1 teaspoon yellow mustard, smooth variety
- ¼ teaspoon allspice, finely ground (the secret weapon)
Assembling Your Perfect Bowl
- 4 cups steamed Japanese rice, preferably short-grain
- 2 cups crisp cabbage, shredded thin as paper
- 1 large carrot, julienned into fine strips
- 4 radishes, sliced into delicate rounds
- 2 green onions, sliced diagonally for elegance
- 1 tablespoon sesame seeds, toasted to golden perfection
- Pickled ginger slices (authentic touch, highly recommended)
Emergency Substitutions: No mirin in sight? Mix 1 tablespoon rice wine vinegar with 2 teaspoons white sugar. Panko shortage? Combine regular breadcrumbs with crushed rice cereal for texture mimicry. Creating vegan versions? Swap Worcestershire for plant-based alternatives enhanced with a whisper of liquid smoke.
Your Katsu Timeline: Efficiency Meets Excellence
Preparation Window: 25 minutes (smart organization accelerates everything) Cooking Duration: 20 minutes (sauce creation plus frying time) Complete Process: 45 minutes total (faster than takeout, infinitely better)
This refined timing ensures you’ll enjoy piping hot, restaurant-quality katsu while maintaining your sanity and kitchen organization.
The Katsu Method: Eight Steps to Perfection
Step One: Achieving Uniform Thickness
Start with properly prepared protein. For pork cutlets, sandwich each piece between plastic wrap and pound gently with a meat tenderizer until reaching consistent ½-inch thickness throughout. Chicken breasts require butterflying—slice horizontally almost through, then open like a book and flatten lightly. Season both sides liberally with salt and pepper. This uniformity prevents the dreaded combination of burnt edges surrounding raw centers.
Step Two: Establishing Your Breading Station
Organization prevents chaos during the breading process. Create three dedicated zones: seasoned flour mixed with garlic powder in a shallow plate, thoroughly beaten eggs in a wide bowl, and panko breadcrumbs spread generously on a large platter. Position them in order of use to create an efficient assembly line that prevents cross-contamination.
Step Three: The Sacred Breading Ritual
Handle one piece at a time for optimal results. Begin by dredging completely in seasoned flour, ensuring coverage while shaking away excess. Submerge entirely in beaten egg, paying special attention to edges and corners. Finally, press decisively into panko, packing crumbs firmly onto every surface to maximize coating density. Transfer completed pieces to a wire rack for a critical 5-minute rest—this pause dramatically improves coating adherence during the frying process.
Step Four: Sauce Alchemy
While your breaded cutlets rest, combine all sauce components in a thick-bottomed saucepan. Apply medium-low heat while stirring continuously to prevent burning. Allow gentle simmering for 5-7 minutes until mixture achieves consistency that clings to spoon backs. Remove from heat immediately—residual heat continues the thickening process while developing complex flavor layers.
Step Five: Mastering the Fry
Achieve oil temperature of precisely 350°F (175°C) using a dependable thermometer—guesswork ruins katsu dreams. Gently introduce breaded pieces to hot oil, never overcrowding which causes temperature drops and soggy disasters. Maintain 3-4 minutes per side until reaching deep amber perfection, simultaneously monitoring internal temperatures (pork needs 145°F, chicken requires 165°F).
Step Six: Strategic Draining
Move finished katsu immediately to wire racks elevated above paper towels. This positioning prevents steam condensation that destroys coating crispness. Rest pieces for 2-3 minutes before cutting—this interval allows internal juices to redistribute for optimal tenderness.
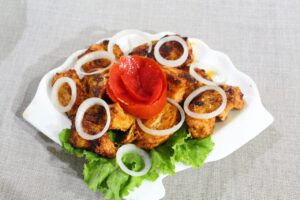
Step Seven: Presentation Artistry
Employ your sharpest blade to slice katsu into ½-inch strips, cutting against grain direction. Divide warm rice among serving bowls, arrange katsu slices in attractive fans across surfaces. Position fresh vegetables strategically for color contrast and textural variety. Apply sauce liberally over katsu or provide separately for individual preference.
Step Eight: Finishing Flourishes
Crown each bowl with scattered green onions and toasted sesame seeds. Include pickled ginger portions for authentic completion. Serve immediately while coating crispness peaks and temperature contrasts between exterior crunch and interior tenderness remain most dramatic.
Nutritional Intelligence
Per serving analysis reveals:
- Energy: 620 calories (substantially less than restaurant equivalents)
- Protein: 38g (complete amino acid spectrum)
- Carbohydrates: 68g (predominantly complex from rice)
- Dietary Fiber: 4g (vegetable contributions)
- Sugars: 8g (naturally occurring)
- Fat: 21g (6g saturated, primarily from quality oils)
- Sodium: 890mg (30% reduction from typical restaurant versions)
- Iron: 20% recommended daily amount
- Calcium: 8% daily requirement
- Vitamin A: 45% daily needs
- Vitamin C: 15% daily recommendation
Healthier Katsu Innovations
Air Fryer Revolution
Execute katsu using air fryer technology at 375°F for 12-15 minutes with mid-process flipping. This approach eliminates 90% of frying oil while maintaining signature texture, reducing caloric content by roughly 120 per portion.
Oven-Baked Excellence
Lightly mist breaded cutlets with cooking spray before baking at 425°F for 18-20 minutes. This technique reduces fat by 65% while preserving exceptional taste and satisfying crunch.
Whole Grain Upgrade
Replace standard panko with whole grain alternatives to boost fiber by 40% while introducing subtle nutty undertones that enhance sauce compatibility.
Carbohydrate Modification
Substitute traditional rice with cauliflower rice alternatives, reducing carbohydrate load by 70% while maintaining portion satisfaction and adding nutritional density.
Plant-Based Transformations
Create impressive vegetarian versions using extra-firm tofu, seasoned tempeh, or marinated seitan cutlets. Enhance plant proteins with umami-rich vegetable broth and aromatic liquid smoke for depth rivaling traditional preparations.
Inspired Serving Concepts
Classic Curry Harmony
Partner with authentic Japanese curry for the time-honored combination that defines Japanese comfort cuisine. The curry’s gentle spices and rich texture create perfect katsu companionship.
Katsudon Evolution
Transform into beloved “Katsudon” by crowning with caramelized onions and silky scrambled egg, producing one of Japan’s most cherished rice bowl traditions.
Bento Artistry
Organize components within separate bento compartments featuring rice, katsu, assorted pickles, and individual sauce portions for authentic portable dining.
Sandwich Renaissance
Convert leftovers into “Katsu Sando”—Japan’s celebrated sandwich showcasing katsu nestled between pillowy milk bread with crisp cabbage and tangy sauce.
Seasonal Adaptations
Integrate seasonal vegetables like tender spring asparagus, ripe summer corn, autumn butternut squash, or hearty winter Brussels sprouts to maintain year-round excitement.
Avoiding Common Pitfalls
Temperature Disasters
Incorrect oil temperature causes most home cooking catastrophes. Excessive heat burns exteriors while leaving centers raw; insufficient heat creates greasy, limp results. Reliable thermometry and consistent 350°F maintenance prevent these failures.
Overcrowding Catastrophes
Introducing too many pieces simultaneously drops oil temperature dramatically while generating steam that destroys coating integrity. Patience with batch cooking ensures consistent quality.
Resting Negligence
Skipping the post-breading rest period reduces coating adhesion significantly. This simple 5-minute pause prevents the heartbreaking sight of beautiful breading sliding off during frying.
Sauce Concentration Errors
Excessive reduction creates thick, gluey consistency that overwhelms rather than complements. Stop reduction when sauce coats spoon backs—cooling continues the thickening naturally.
Slicing Mistakes
Cutting parallel to muscle fibers produces chewy, unpleasant texture regardless of perfect cooking. Always slice perpendicular to grain for maximum tenderness.
Storage Mastery and Meal Planning
Immediate Storage
Store leftover katsu separately from accompaniments in airtight containers with wire rack elevation to prevent moisture softening. Refrigerate up to 2 days while maintaining reasonable crispness.
Sauce Preservation
Homemade sauce refrigerates beautifully for 2 weeks in sealed containers. Flavor complexity actually improves after initial 24-hour mellowing period.
Freezer Strategy
Pre-cooking breaded cutlets freeze excellently for 3 months. Freeze individually on sheets before transferring to storage bags. Cook directly from frozen state, adding 2-3 minutes to standard timing.
Meal Prep Efficiency
Weekend component preparation enables rapid weekday assembly. Separate storage maintains individual freshness while providing convenient, restaurant-quality meals throughout busy periods.
Reheating Science
Restore leftover crispness using 350°F oven heating for 7-10 minutes. Microwave reheating destroys texture almost completely, reducing crunchiness by 80% or more.
Achieving Katsu Mastery
Excellence in katsu preparation stems from understanding fundamental principles rather than following rigid rules. Each component serves specific purposes—flour provides foundation, egg creates adhesion, panko delivers texture, and proper temperature ensures success. Master these relationships, and countless variations become possible.
The journey from novice to katsu master rewards patience and attention to detail. Small improvements in technique yield dramatic results, transforming simple ingredients into memorable meals that satisfy both body and soul. Whether preparing weeknight dinners or special occasion feasts, mastering katsu opens doors to Japanese culinary tradition while building confidence in your own kitchen.
Success lies not in perfection from the start, but in understanding why each step matters and how modifications affect final results. This knowledge empowers creativity while maintaining authentic spirit, ensuring every katsu creation becomes a source of pride and satisfaction.
Expert Answers to Common Questions
What creates katsu’s distinctively crunchy texture? Japanese panko breadcrumbs hold the secret—their unique manufacturing process creates irregular, airy flakes that provide superior surface area and insulation properties. This structure maintains crispness longer while creating more satisfying textural contrast than standard breadcrumbs.
Is deep frying absolutely necessary for authentic results? While traditional deep frying produces classic results, both air frying and oven baking deliver excellent alternatives with health benefits. The texture varies slightly, but both methods achieve satisfying crispness that honors katsu’s essential character.
How can I tell when katsu reaches perfect doneness? Visual indicators include rich golden-brown coloring and steady bubbling around edges. For absolute certainty, internal temperature readings provide foolproof guidance: pork requires 145°F minimum, chicken needs 165°F. Properly cooked coating sounds crisp when tapped lightly.
Which oils work best for katsu frying? Neutral oils with high smoke points excel—vegetable, canola, and peanut oils top the list. Avoid strong-flavored options like olive oil or low smoke point fats like butter, which interfere with delicate katsu flavors while risking burning.
How do I adapt this recipe for gluten-free diets? Replace wheat flour with rice flour, substitute tamari for soy sauce, and source certified gluten-free panko (increasingly available at specialty stores). These modifications preserve authentic flavors while accommodating dietary restrictions.
Why does my breading separate during cooking? This frustrating problem usually stems from inadequate resting time after breading or unstable oil temperatures. Five-minute post-breading rest dramatically improves adhesion, while maintaining steady 350°F prevents coating failure during frying.
Related posts:
 The Ultimate Guide To Cinnamon Roll French Toast Bites
 The Ultimate Honey Butter Chicken Recipe: Sweet & Savory Perfection At Home
 Grilled Pineapple: The Ultimate Guide To Sweet Perfection
 Cowboy Butter Chicken: The Ultimate Guide For Flavor Enthusiasts
 How To Make A Homemade Honey Bun Cake: The Ultimate Guide
 Homemade Gluten Free Enchilada Sauce: A Complete Guide