
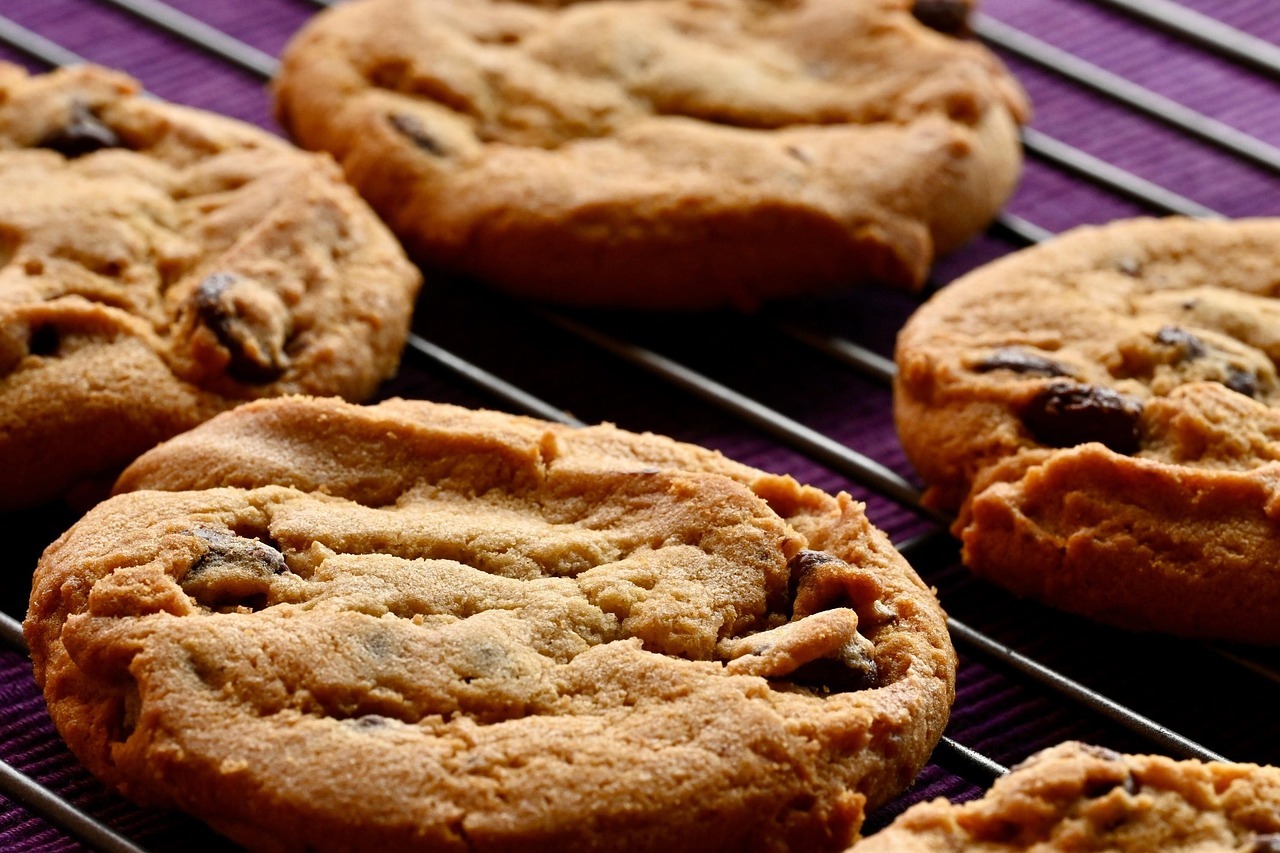

Picture this: you take a bite of a perfectly baked cookie and experience layers of flavor that dance across your taste buds—rich, velvety chocolate harmonizing with bright, tart cherries in a symphony of sweetness. This isn’t just another cookie recipe; it’s your gateway to creating confections that rival the finest artisanal bakeries.
Understanding the Science of Exceptional Cookies
The magic behind extraordinary cherry chocolate cookies lies in the chemistry of baking. When flour proteins meet moisture and heat, they form the structure that holds everything together. Meanwhile, fats create tenderness, sugars provide sweetness and browning, and leavening agents give lift. Understanding these interactions transforms you from a recipe-follower into a cookie artist.
The pairing of chocolate and cherry isn’t accidental—it’s genius. Cherries contain natural acids that brighten chocolate’s deep, sometimes bitter notes, preventing flavor fatigue that comes with overly sweet treats. The contrast creates what food scientists call “flavor complexity,” where each component enhances the other rather than competing for attention.
Texture plays an equally crucial role. The slight chewiness of dried cherries against the smooth melt of quality chocolate creates textural interest that keeps each bite engaging. Fresh cherries add bursts of juice that create steam pockets during baking, contributing to the cookie’s tender crumb structure.
Selecting Your Arsenal of Ingredients
The Structural Foundation
Flour Power:
- 2½ cups bread flour (higher protein content for better structure)
- 1 teaspoon baking powder
- ¾ teaspoon sea salt
- 1½ tablespoons potato starch (creates exceptional tenderness)
The Richness Providers:
- 1 cup plus 2 tablespoons salted butter, at cool room temperature
- ¾ cup turbinado sugar
- ⅓ cup white sugar
- 1 whole egg plus 2 egg yolks
- 1 tablespoon pure vanilla paste
The Flavor Heroes:
- 1¾ cups roughly chopped 70% dark chocolate
- 1¼ cups dried sour cherries or 1 cup fresh cherries, quartered
Ingredient Mastery Tips
Flour Choice: Bread flour’s higher protein content creates cookies with more structure and chew. If unavailable, add 1 tablespoon vital wheat gluten to all-purpose flour.
Sugar Balance: Turbinado sugar adds molasses complexity and helps cookies hold moisture longer. The combination with white sugar creates ideal spreading characteristics.
Cherry Selection: Sour cherries provide the perfect acidic contrast to chocolate. If using sweet cherries, add a pinch of citric acid to maintain flavor balance.
Chocolate Quality: Choose chocolate you’d enjoy eating plain. Single-origin chocolates offer unique flavor profiles that can elevate your cookies from good to extraordinary.
Crafting Cookie Perfection: The Process
Phase One: Building the Base
Begin by whisking together flour, baking powder, salt, and potato starch in a large bowl. The potato starch—a secret from professional bakers—inhibits gluten formation more effectively than cornstarch, resulting in incredibly tender cookies.
Phase Two: The Creaming Revolution
In your mixer bowl, combine butter with both sugars. Cream on medium-high speed for exactly 7 minutes. This extended creaming time creates microscopic air bubbles that give cookies their signature tender-crisp texture. The mixture should nearly double in volume and appear almost white when properly creamed.
Stop mixer twice during creaming to scrape bowl thoroughly—uneven creaming leads to dense spots in finished cookies.
Phase Three: Binding Elements
Add whole egg first, mixing until completely incorporated. Follow with egg yolks one at a time, then vanilla paste. The extra yolks contribute richness and help bind ingredients without adding excess liquid that could make cookies spread too much.
Phase Four: Gentle Integration
Switch to lowest mixer speed and add flour mixture in four additions, mixing just until each addition disappears. The goal is minimal gluten development for maximum tenderness.
Phase Five: The Grand Assembly
Remove bowl from mixer entirely. Using a large wooden spoon or spatula, fold in chocolate and cherries with slow, deliberate motions. This hand-folding prevents overmixing while ensuring even distribution throughout the dough.
The Precision of Perfect Baking
Strategic Preparation
Shape dough into 3-tablespoon portions using a large cookie scoop. Place on parchment-lined sheet pans and refrigerate for minimum 4 hours. Overnight chilling allows flavors to develop while ensuring cookies maintain proper thickness during baking.
Preheat oven to 360°F—slightly lower than typical cookie temperatures to allow centers to cook through while preventing over-browning.
The Baking Ballet
Position cookies exactly 3 inches apart on heavy-gauge baking sheets. Light-colored pans prevent bottom over-browning that can occur with dark surfaces.
Bake for 11-13 minutes, rotating pans 180 degrees at the 6-minute mark. Cookies are perfectly done when edges appear set and centers look barely underdone—they’ll continue cooking on the hot pan.
Cooling Choreography
Let cookies rest on baking sheets for exactly 4 minutes before transferring to wire racks. This precise timing allows structure to set while preventing overbaking from residual heat.
Professional Secrets for Superior Results
Advanced Flavor Development
Browning Butter Enhancement: Replace ¼ cup regular butter with browned butter for nutty undertones that complement both chocolate and cherry flavors.
Salt Finishing Touch: Sprinkle finished cookies with flaky sea salt to intensify sweetness perception and add textural contrast.
Cherry Juice Reduction: Simmer ¼ cup cherry juice until syrupy, then brush onto cookie tops before baking for intensified cherry flavor.
Texture Manipulation Techniques
For Chewier Centers: Reduce baking time by 1-2 minutes and press cookie centers gently with spatula immediately after removing from oven.
For Crispier Cookies: Increase oven temperature to 375°F and bake until edges turn golden brown, about 2 minutes longer than standard time.
For Cake-Like Texture: Add an additional egg yolk and 2 tablespoons milk to the dough for more moisture and lift.
Storage Mastery and Planning Ahead
Store cooled cookies in airtight containers with tight-fitting lids for up to 10 days. Place parchment paper between layers and add a small piece of fresh bread to maintain optimal moisture levels.
For extended storage, wrap individual cookies in plastic wrap and freeze in freezer bags for up to 6 months. Thaw at room temperature wrapped to prevent condensation.
Cookie dough balls freeze beautifully for up to 1 year. Bake directly from frozen, adding 3-4 minutes to standard baking time. This allows for fresh cookies whenever cravings strike.
Creative Interpretations and Seasonal Twists
Holiday Transformations
Christmas Spice: Add ½ teaspoon each of cinnamon and nutmeg, plus ¼ teaspoon ground cloves for warm holiday flavors.
Valentine’s Romance: Use freeze-dried raspberries instead of cherries and white chocolate chunks for elegant pink and white cookies.
Easter Spring: Incorporate lemon zest and dried cranberries with white chocolate for bright, fresh flavors.
Gourmet Elevations
Create sandwich cookies by spreading cherry preserves or chocolate ganache between two cooled cookies. Dust with powdered sugar for bakery-style presentation.
For special occasions, dip half of each cooled cookie in tempered dark chocolate and roll in chopped pistachios for an elegant finish.
Solving Common Cookie Conundrums
Spreading Issues: Usually indicates butter was too warm or dough wasn’t chilled long enough. Always chill shaped dough until firm before baking.
Dense Texture: Often results from inadequate creaming time or using cold eggs. Cream butter and sugars for full 7 minutes and ensure eggs are at room temperature.
Burnt Bottoms: Switch to light-colored baking sheets and position oven rack in center position rather than bottom third.
Uneven Color: Rotate pans halfway through baking and ensure oven temperature is accurate using an oven thermometer.
The Art of Cookie Excellence
These cherry chocolate cookies represent more than a simple dessert—they’re an expression of culinary craftsmanship that transforms basic ingredients into something extraordinary. The interplay of techniques, timing, and quality ingredients creates cookies that deliver restaurant-quality results in your home kitchen.
Success requires patience during the creaming process, precision in measuring ingredients, and restraint to avoid overmixing. These aren’t shortcuts to skip but rather investments in the final product that separate amateur results from professional-quality cookies.
The true reward comes not just from the delicious results, but from mastering techniques that apply to countless other baking projects. Understanding proper creaming, recognizing correct dough consistency, and knowing when cookies are perfectly baked are skills that will serve you throughout your baking journey.
Master these cherry chocolate cookies, and you’ll have created more than just a recipe—you’ll have developed a signature treat that becomes part of your culinary identity, requested at every gathering and remembered long after the last crumb disappears.
Related posts:
 Master The Art Of Chocolate Cream Cheese Danish: From Kitchen Novice To Pastry Pro
 The Ultimate Churro Cheesecake Cookies: A Fusion Dessert Masterpiece
 The Ultimate Guide To Strawberry Lemonade Cookies
 Cowboy Butter Chicken: The Ultimate Guide For Flavor Enthusiasts
 Decadent Chocolate Cherry Upside Down Cake: A Perfect Blend Of Rich And Fruity Flavors
 How To Make Cinnamon Roll Sugar Cookies: The Ultimate Recipe